Hello Gleaners! Rose here! We were recently going to put on a pressure canning class; but were waylaid by Covid-19. We’re putting a lot of the classes we were going to teach online instead, and since this was going to be our first class, this will be our first How to blog post! Hope you enjoy 🙂
I. What needs to be pressure canned and why?
Pressure canning is for low-acid foods. What we mean by low-acid foods are: most vegetables, meats, beans and soups and broths, corn; basically anything that is not a fruit or a jam / jelly, or pickles. The reason for this is to prevent the growth of the bacteria clostridium botulinum, more commonly known as botulism. Botulism causes horrible food poisoning from low-acid foods; so the best way to prevent this kind of food poisoning and to have your food last up to 3 years is to pressure can it.
The only way to kill botulism is to pressure can at 240 degrees Fahrenheit for the correct amount of time. Botulism is actually harmless until it is put in a low-acid, oxygen free environment like a canning jar. Most people generally agree that pressure canning is the best way to keep the danger level low. Granted, there are naysayers who say they can just water bath can for hours and hours, or they never pressure can anything and are fine; but honestly, why not be more safe than sorry? Plus, pressure canning is easy and efficient and you have a much higher chance of your food being safe to eat and preserved. So it just makes sense.
II. How does a pressure canner work?
Basically a pressure canner is a giant kettle with a lid. The lid has a rubber gasket that screws on tight, and therefore allows the pressure to form as it heats up. Each canner will include a gauge to show how high the pressure is, a rack to put your jars on so they aren’t directly on the bottom of the canner, a vent port for steam to escape, a counterweight for the vent port and a safety fuse.
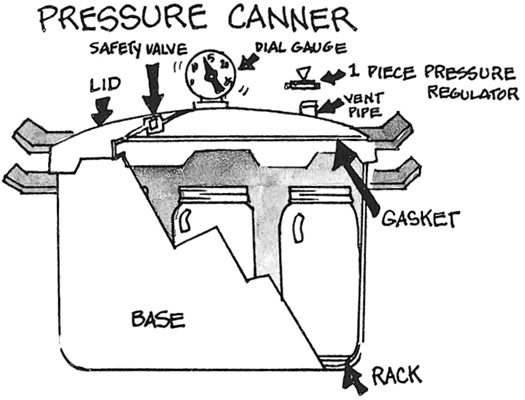
The way they work is: you put in a certain number of cups of water (each canner will have a different amount and will tell you in the directions they come with); and once the water boils, the steam vents out all of the air inside, leaving boiling water and water vapor, and this is what will heat the inside to 240 degrees Fahrenheit.
Basic Instructions for Pressure Canning
First of all, I want to mention that the times for canning different vegetables and meats will be different, it also depends on what elevation you are at when canning. I highly recommend Ball’s Blue Book for basic canning recipes. It’s a great standard book with easy to follow instructions.
- Inspect all parts to your canner. Make sure the rubber gasket is clean and doesn’t have any defects, cracks or tears. Do not submerge the lid to the canner (the gauge specifically) in water. Make sure there is no rust anywhere, or missing pieces. Check for dents, corrosion and cracks in the glass on the pressure gauge. If you need to check your gauge you can contact your local county extension office.
- In addition to checking the canner itself, you need to check your jars, rings and lids before filling them with food. Each jar should have no cracks or chips, and your rings and lids should have no rust, dents or bent parts, and you need to make sure that the rubber seals on the lids have no defects. Make sure they are washed and sanitized. I find a dishwasher does an excellent job of this, but if you don’t have access to a dishwasher, just wash them as well as possible and fill them with hot water and set aside. Filling with hot water makes them warm and less susceptible to shock from hot liquids or from being heated.
- Put the canner on the largest burner of the stove. If you have a glass top stove, check your manufacturer’s manual to make sure it’s okay to can on it; and make sure the canner does not extend past the edge of the burner more than 1 inch. This page is a good reference for canning on glass or ceramic top stoves.
- Fill the canner with water per the instructions that came with the canner. If you no longer have the instructions, you can google the brand of canner you have to find out. My personal canner is a Presto 23 quart canner, and it takes 3 quarts of water. Start heating the water. Don’t let it boil too much because you don’t want it to boil off while you’re filling the jars. Add 2 Tbsp. of white vinegar to prevent water staining on your jars. Make sure the rack is on the bottom of the canner!
- Now it’s time to fill the jars with the food. Make sure that all food is clean and fresh. Allow 1 inch of headspace in the jars, this is due to expansion that will happen while the canning process happens. Boil hot water in a separate pot and use a ladle to fill the jar with this water, again, minding the 1 inch headspace. Use a chopstick to stir out the bubbles. Wipe the edge clean with a clean cloth. Check your recipe to make sure you have added everything you need to such as salt for example.
- I tend to boil another pot of water with the lids and bands so they are hot and the rubber is warm and soft, which I think makes a better seal. I pull them out with tongs, and place them on the jars. Screw on lids to finger tight. Then use a jar lifter to place the jars into the canner. Most canners will hold 7 quart jars. For more information on minimum jar loads per canner, see this article.
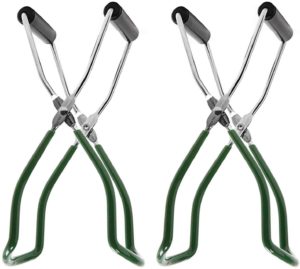
Jar lifters
- Next line up the lid on the pressure canner, and screw closed. Most canners you will see arrow where you line up the lid and which direction to turn the lid to lock it in place. Be sure you’ve got this exactly or the canner will not pressurize properly. Turn the heat on high and watch for steam to come out the vent hole. After about 10 minutes of the steam coming out at a strong pace, place the weight on top of the vent hole.
- Now the canner will start to pressurize. You will start timing once the weight starts jiggling (for canners that don’t have a pressure dial) or when the pressure gauge reads the correct pressure. You may have to adjust the heat up and down to keep this steady. Keep an eye on it. Your pressure should read 11 PSI for most recipes.
- Start timing once your gauge is at the correct pressure. Each recipe will have a different time. Again, I recommend the Ball Blue book as a good basic canning recipe book.
- At the end of canning time, turn off the heat and remove the canner from the heat. Just let the pressure drop on its own. don’t take the weight off, don’t run water over the canner, do not try to quick cool in any way; just be patient! Canners can take up to 45 minutes to completely reduce in pressure. Some canners have pistons in the vent lock that drop when the canner is depressurized and you can hear this drop.
- Once the pressure has reduced completely, remove the weight off of the vent pipe, and let cool for another 10 minutes. Always remove this before opening the lid.
- After 10 minutes, unlock the lid and remove it. Face it away from you and wear oven mitts. Canners are still VERY HOT even after depressurizing and cooling for 10 minutes. The contents of the jars may still be boiling when you pull them out.
- Remove the jars from the canner with a jar lifter, and set on a cloth to cool. Keep the jars 1 inch apart to cool. Don’t press on the lids or remove the rings or anything until completely cool. Sometimes it takes up to 12 hours for the jars to cool completely.
- Once the jars are cool, you may choose to take off the rings so they don’t rust. This is personal preference. I personally leave the rings on my jars. Wipe the jars clean, and label them. Store in a cool dry place.
COMING SOON: Videos of Gleaners Pressure Canning Tuna!